GRP Valley System
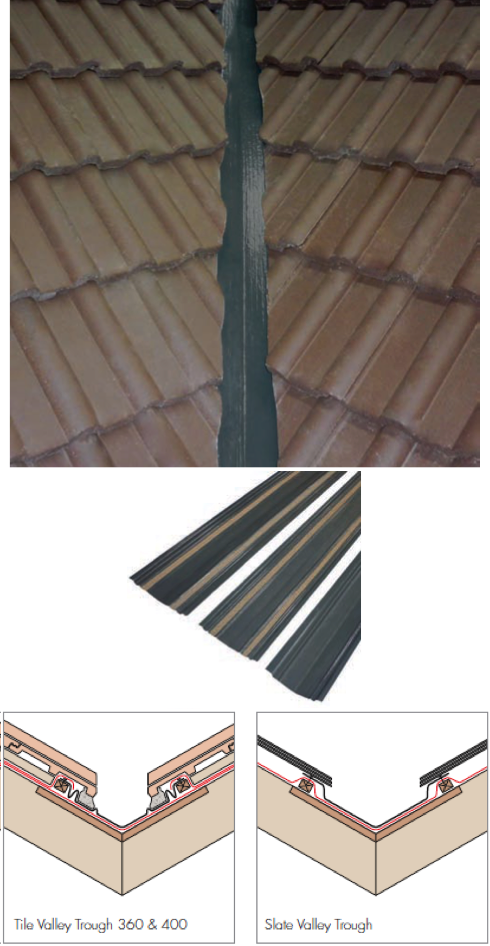
GRP Valleys provide a robust, durable and lightweight alternative to lead and zinc valleys.
Product features & benefits
![]()
- Cost effective alternative to lead
- Lightweight, flexible, safe and easy to cut
- UV resistant
- BBA certified – certificate no 12/4928
Area of application Suitable for:
- Use on tile and slate pitched roofs
- For plain angles of 90° only
- 20° maximum pitch variance
- 5° minimum rafter pitch
- 60° maximum rafter pitch
Material
Grey UV stabilised Glass Reinforced Polyester
Dimensions
- Tile Valley Trough – 360 3m long x 360mm wide x 1.1mm
- Tile Valley Trough – 400 3m long x 400mm wide x 1.1mm
- Slate Valley Trough – 3m long x 225mm wide x 1.1mm
Product Codes / Weight (per pack)
- Tile Valley Trough 360 – KR965210 – 24kg
- Tile Valley Trough 400 – KR965510 – 29kg
- Slate Valley Trough – KR965610 – 19kg
Regulations
- BBA certified
- Fire tested to comply with BS476: Part 3 SAB and Part 7 Class 3
Performance
- Allow 150mm overlap for rafter pitches 40° – 60°.
- Allow 200mm overlap for rafter pitches 22.5° – 39.5°.
- Allow 250mm overlap for rafter pitches 17.5° – 22°.
Packaging
Banded in packs of 10 pcs
Installation
The GRP Valleys must be laid on valley boards either cut between the valley rafters or a boarding 6mm thick overlaid on top of the valley rafters.
- Lay 19mm support board cut between rafters and supported on 38 x 25mm noggins nailed to rafters. Top surface of support board must be flush with top of trussed rafter. Alternatively a 6mm plywood board may be installed on top of the rafters.
- Position the valley battens along either side of valley.
- Lay underlay to main roof tiles as normal to finish on top of valley battens.
- Abut tiling battens to valley on top of the support boards and fix into position.
- Lay valley trough, allowing overlap at joints cut to suit at ridge and eave.
- Using clout headed nails, nail to valley battens through 8mm drilled holes, at approximately 1 metre intervals.
- Lay roof tiles up to valley and cut to rake, various gaps between cut tiles to form open channel, dependent on pitch.
- Bed tiles with mortar to valley trough sanded strips, ensuring water channels are clear and interlocks are not blocked.
For Slate Valley, as above, except that slates do not need to be bedded with mortar, but can be laid ‘dry’.
Would you like to talk to us about your requirements?
Download our Roof Tile brochure
Download our Roof Tile brochure (UK Only)