Dry Ventilated Ridge System Fitting Instructions
 1. Lay the underlay and batten the roof in the normal manner, but do not fix the top tiling battens at this stage. Ensure that the top courses of underlay are cut to finish 30mm short of the ridge apex.
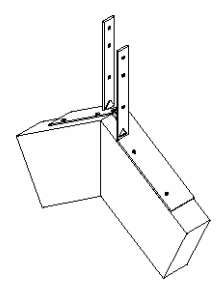
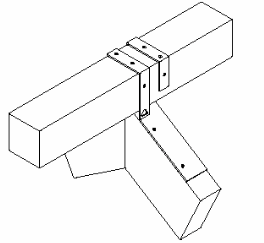 2. Bend the ridge batten straps at the centre mark, to suit the pitch of the roof. Position them centrally over the roof apex, at not more than 1000mm centres, and secure to the rafters or trusses with 30mm Clout head nails (only through the sections with 2 nail holes). Bend the free sections of the ridge batten straps, where marked, vertically upwards on both sides of the ridge.
 3. Select a ridge batten of the correct size to suit the roof pitch and the type of roof tile being used (for guidance use the table opposite) and position between the upturned sections of the straps. Bend the straps over the ridge batten and secure with clout head nails.
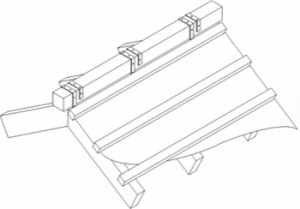 4. Position and fix the top tiling battens so that the minimum headlap of the ridges over the top courses of tiles is maintained. Nail the tiling battens over the ridge batten straps and then lay and fix the top courses of tiles in the normal way.
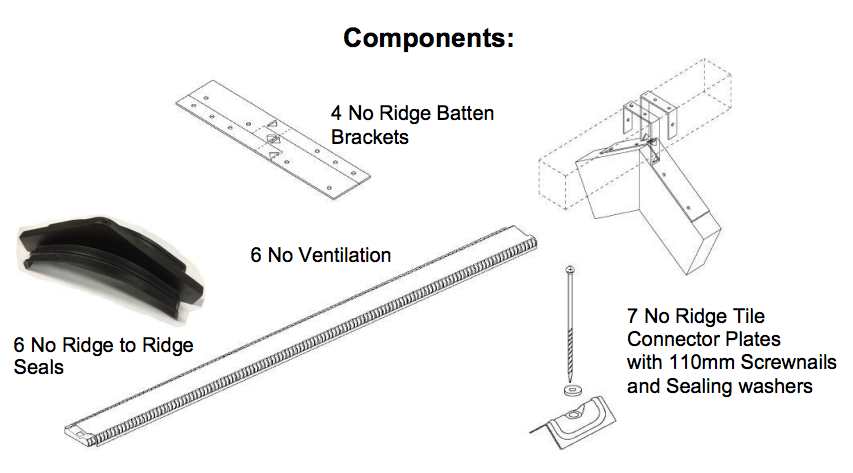
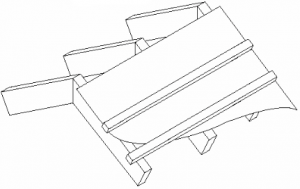
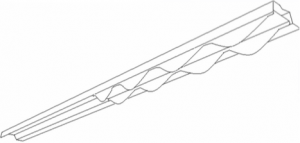 5. For Loch Erne tiles, click profile fillers into the ventilation units and then click the ventilation units end to end and position either side of the ridge. Make sure they are facing the correct way. (Note that the arrows on both the ventilation units and the profile fillers point towards the ridge). It may be necessary to cut the final pieces to suit the ridge length.
 6. At gables fit a block end ridge on the ventilation units and then fit a ridge to ridge seal under the open end of the ridge tile. Always work from the Gable towards an abutment .To secure the Block End ridges it will be necessary to drill a 4mm diameter hole, 100mm in from the outside end. Fix securely using a ridge connector plate and a 110mm Stainless steel screw nail and washer as provided. The screw nails can be driven in with a hammer and then finally tightened with a screwdriver. They may also be removed with a screwdriver.
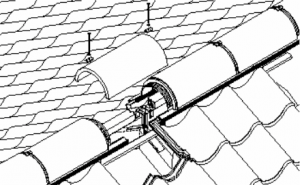 7. Position a ridge to ridge seal under the open end of the first ridge tile and then place the next ridge tile over the seal. Place a ridge tile connector plate over the joint, parallel to the ridge line, and nail securely through the hole in the ridge seal, into the ridge batten, with the Screw nails and washers provided. Continue fixing in the same way along the entire length of the ridge, cutting the final ridge tile to fit. Do not attempt to secure cut ridges less than 200mm long. In this case cut the last 2 ridge tiles. Never place cut ridge tiles at the end of the ridge line.

| Rafter Pitch | Universal Angle Ridge | |||
| Condron Slate Tile, The Condron Slate, Senior Slate | Double Lap Slates | Condron Pantile, `M' Profile | Concrete Plain Tiles, 3 in 1 Tiles | |
| 17½° | 75 | - | 125 | - |
| 20° | 75 | 75 | 125 | - |
| 22½° | 75 | 50 | 100 | - |
| 25° | 75 | 50 | 100 | - |
| 27½° | 75 | 50 | 100 | - |
| 30° | 50 | 25 | 100 | - |
| 32½° | 50 | 25 | 100 | - |
| 35° | 50 | 25 | 75 | 50 |
| 37½° | 25 | 25 | 75 | 50 |
| 40° | 25 | 25 | 75 | 25 |
| 42½° | 25 | - | 75 | 25 |
| 45° | 25 | - | 75 | 25 |
| 47½° | - | - | 50 | 25 |
Would you like to talk to us about your requirements?
Download our Roof Tile brochure

Download our Roof Tile brochure (UK Only)