Dry-Fix Ridge System Fitting Instructions
Carton Contents
- 1 – 300mm x 5 metre Ventilated Ridge Roll
- 10 – Net free ventilation area of roll = 20,000mm2/m Ridge to Ridge Seals
- 10 – 110mm Stainless Steel screw nails with fitted neoprene washers
- 10 – Ridge tile connector plates & plastic plugs
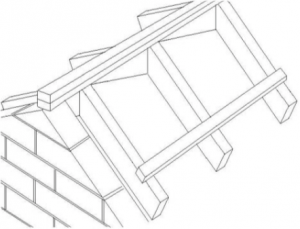
1. Lay the underlay and batten the roof in the normal manner, but do not fix the top tiling batten at this stage. Ensure that the top batten is as close to the ridge batten as the tile nibs will allow. Install a ridge batten, using a combination of tiling battens to achieve the correct height.
 2. Lay and fix the top courses of tiles in the normal way, including all dry verge or mortar bedded verge tiles/slates. Ensure that all fixing of tiles/slates is in accordance with fixing recommendations.
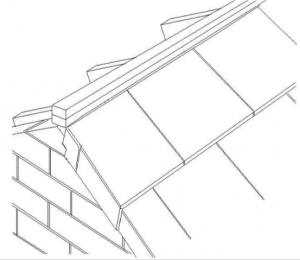
 3. Before installing the ridge roll, make sure that the tiles/slates are dry and free from dust and any other surface contamination which could prevent the butyl from sticking to the tiles/slates
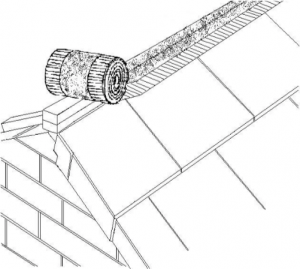 4. Roll out the ridge roll along the centre line of the ridge batten and secure with staples or felt nails. Peel off the protective paper strip from the butyl tapes on either side of the roll and press down on to the tiles/slates, ensuring a continuous surface contact.
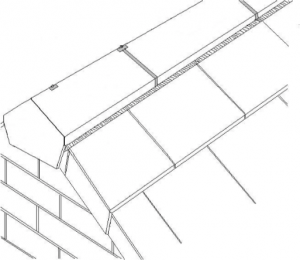 5. Position a ridge to ridge seal under the open end of the first ridge tile and then place the next ridge tile over the seal. Place a ridge tile connector plate over the joint, parallel to the ridge line, and push a plastic plug through the hole in the plate and into the ridge to ridge seal. Nail securely through the hole and into the ridge batten, using the screw nails and washers provided. The screw nails can be driven in with a hammer and then finally tightened, or removed, with a screwdriver. Always ensure that the screw nails penetrate the ridge batten by a minimum of 40mm.
Continue fixing in the same way along the entire length of the ridge, cutting the final ridge to fit. Do not attempt to secure cut ridges less than 200mm long. In this case cut the last 2 ridge tiles. Never place cut ridge tiles at the end of the ridge line.
Joining Ridge roll
When joining ridge roll the overlap must be a minimum of 75mm
T Shaped Buildings
At the ridge intersection of a T shaped building, or where a lower level ridge intersects a roof slope, the ridge construction should not cross over the valley construction. Install a lead saddle onto the valley before laying the tiles/slates. Roll out the ridge roll along the head of the T Shape and stick the aluminium edge to the lead saddle. The ridge roll on the leg of the T shape, or where a low level ridge meets the valley, should be cut back 50mm from the face of the mortar bedding.
Mortar bedded Verge and end Ridge
Cut the ridge batten back 100mm and the ridge roll 50mm from the flush face of the mortar. Always fit the gable end ridges first and work from gable ends towards abutments. The end ridge is installed onto the verge mortar bedding, flush with the edge of the verge. To secure the end ridge it will be necessary to drill a 5mm diameter hole in the centre of the ridge. Fix securely using a screw nail, washer and plate as provided. Finish the mortar bedding in the usual manner.
L Shaped Buildings
At the ridge intersection the ridge roll should be overlapped by a minimum of 75mm. Install a lead saddle between the ridge roll and the ridge and hip tiles, with a welt along the edges under the ridge tiles. The end ridges and top hip tile should be neatly mitred, with the end ridge tiles drilled as for a mortared verge. Bed the ends of the ridge tiles with the hip before screwing them to the ridge batten with the screw nails, washers and plates provided. Ensure that the screw nails do not penetrate the lead saddle. Flush off the mortar bedding.
Dry Verge and Block-end Ridge
Cut the ridge batten flush with the inside face of the cloaked verge tile (or the outside edge of standard verge tile, where using plastic dry verge systems). Roll the end of the ridge roll down over the face of the dry verge and up under the verge. Always fit the gable end ridges first and work from gable ends towards abutments. The Block-end ridge is installed tight against the finished verge. To secure the Block-end ridge it will be necessary to drill a 5mm diameter hole 100mm in from the outside end. Fix securely using a screw nail, washer and plate as provided.
Abutments
At Abutments the ridge roll should be turned up the wall by 70mm. The ridge tile should be secured as for a mortar bedded verge and a lead saddle should be installed as per the Lead Sheet Associations recommendations.
Junctions
At ridge/hip junctions extend the ridge batten 50mm beyond the apex where the ridge joins the hip rafters. Turn the ridge roll down 75mm over the tiles on the hip end. Install a lead saddle between the ridge roll and the ridge/hip tiles, with a welt along the edges under the ridge and hip tiles. The end ridge and top hip tiles should be neatly mitred, with the end ridge tile drilled as for a mortared verge. Bed the end of the ridge tile before screwing it to the ridge batten with the screw nails, washers and plates provided. Ensure that the screw nail fixing does not penetrate the lead saddle.
| Rafter Pitch | Universal Angle Ridge | |||
| Condron Slate Tile, The Condron Slate, Senior Slate | Double Lap Slates | Condron Pantile, `M' Profile | Concrete Plain Tiles, 3 in 1 Tiles | |
| 17½° | 75 | - | 125 | - |
| 20° | 75 | 75 | 125 | - |
| 22½° | 75 | 50 | 100 | - |
| 25° | 75 | 50 | 100 | - |
| 27½° | 75 | 50 | 100 | - |
| 30° | 50 | 25 | 100 | - |
| 32½° | 50 | 25 | 100 | - |
| 35° | 50 | 25 | 75 | 50 |
| 37½° | 25 | 25 | 75 | 50 |
| 40° | 25 | 25 | 75 | 25 |
| 42½° | 25 | - | 75 | 25 |
| 45° | 25 | - | 75 | 25 |
| 47½° | - | - | 50 | 25 |
Would you like to talk to us about your requirements?
Download our Roof Tile brochure

Download our Roof Tile brochure (UK Only)